Evaluate Explorations
Export files to the output directory then run the exploration simulations.
Before you evaluate an exploration,
make sure the correct exploration is active and you are pointing to the desired output
directory.
-
From the Design Explorer ribbon, Evaluate tool group, click the
Evaluate tool.

Figure 1.The Evaluate dialog opens. -
Enter or modify dialog values per the following table:
Tip: To only run a nominal run, set the number of runs to 0 for an optimization or set DOE Type to MELS and set the number of runs to 0.
Field Description DOE Type DOE specification to be used. The design explorer will propose a default based on the number of independent design variables. It is recommended to use the default. Note: DOE onlyNumber of runs The design explorer will propose a default number of runs for the exploration. Changing this number of runs may impact the exploration by not allowing enough runs to find a global optimal or not having enough runs to adequately fill a DOE design space. Multi-Execution Change Multi-Execution to the number of solver jobs to run concurrently. Solver By default, explorations will be evaluated using the solvers installed with HyperMesh. You may optionally register and use your own solver scripts. The default solver and any registered solver scripts will appear in the Solver field of the Evaluate dialog. Solver Arguments Any arguments to be passed to the solver. Note: Only applicable for HW installed solvers.Write solver files only If checked, when the exploration is Run, solver files will be generated for each run, but they will not be evaluated, and no results will be available. This option is useful if you want to evaluate your solver runs outside of the design explorer workflow.
Optimize If checked, a DOE-based optimization will be run once the DOE evaluation is complete. Note: DOE onlyGenerate Reports If checked, once the exploration evaluation is complete, additional reports will be generated. Field Prediction: A predictive model will be built using advanced machine learning techniques. The results of this model will be available in the Results Explorer.Note: DOE onlyInclude Options For the purpose of include file management in the context of the Design Explorer, we will consider include files to be “static” if they do not contain any output used by a design variable and to be “dynamic” if they do contain any output used by a design variable. - None
- No action taken by DE. Include files will be written as specified by the Include Paths, as seen in the Include Browser. All include files will be written for each run in the exploration.
- Copy includes
- Static include files will be written one time to a DEIncludes folder under the exploration’s study folder and then copied to each individual run folder during the exploration evaluation.
- Dynamic include files be written directly to each run’s m1 folder during the exploration evaluation.
- The include paths in the original .hm file are not modified. However, the include paths in the study .hm file will be updated accordingly.
- Update includes
- Static include files will be written one time to a DEIncludes folder under the exploration’s study folder.
- Dynamic include files will be written directly to each run’s m1 folder during the exploration evaluation.
- The include paths in the original .hm file are updated to point to the appropriate paths.
-
To register your own solver scripts:
- Click the drop-down option beneath the Evaluate tool and select Register Solver Script.
-
In the Register Solver Script dialog, enter the
appropriate information.
- Label
- Display name for the script. This is what will display in the Evaluate dialog in the list of solvers.
- Varname
- Unique name for the script. Should not contain special characters.
- Type
-
- Access Desktop
- Can be used if you have Altair Access installed.
- Generic
- Used for your own submission script.
- Location
- Browse to and select the script file.
- User Arguments
- Enter any arguments required by the solver script.
Note: To work with the Design Explorer, scripts must copy solver results files back into the same folder the solver deck was submitted from.
- Optional:
Click Export.
Output files are written to the exploration directory.
-
Click Run.
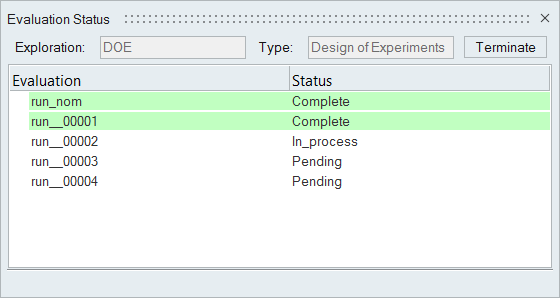
The Evaluation Status dialog opens. Here, you can track the progress of each run.

Figure 2.HyperMesh creates run files in the approaches directory.