Solution Probe |

|

|

|

|
|
Solution Probe |

|

|

|

|
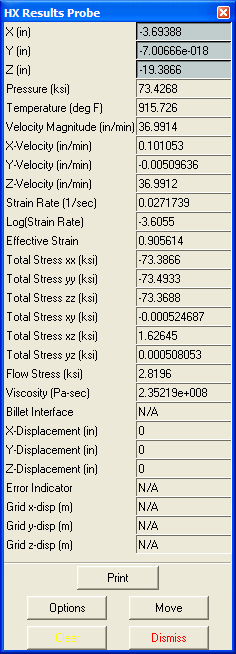
When the probe is selected, the Results Probe panel and a help window open and simultaneously displays an element cursor in the Main Viewport. The probe position is shown in yellow as the intersection of planes perpendicular to the global coordinate axes. The element within which the probe currently resides is outlined in cyan. For a better view of the yellow probe and the cyan element(s), turn the boundary and the mesh off from the Viewport Control panel.
The help window, which appears only when the Results Probe panel is first accessed, provides instructions on how to use the mouse to control the motions of the probe. In summary, the probe location may be controlled with the middle mouse button and the Ctrl key (drag to move) or with the right mouse button and the Ctrl key (click to jump). The probe location may also be adjusted from the Results Probe panel by typing in the coordinates and clicking Move.
As the results probe is moved throughout the computational domain, the coordinate locations, solution and derived quantities are continuously updated and displayed on the Results Probe panel. All components registered for the current problem type are shown on this panel. If a component cannot currently be calculated, its value is shown as N/A.
The options available on the Results Probe panel include:
Field |
Description |
X, Y, Z |
Displays the current probe location. The (x,y,z) coordinates can be directly edited and the location of the probe adjusted (to the given coordinates) by clicking Move. |
Prints the solution results and derived components displayed on the Results Probe panel. |
|
Options |
Brings up the Element Cursor Options panel. This panel enables you to navigate inside the mesh from one element to another interactively. |

The Results Probe panel