Create Stiffened Panel Mesh
Create a quad-dominant mapped mesh from a network of orthogonal lines for global FE model creation. Beam/Bar/Rod elements are created around panel edges.
Restriction: Only available for Nastran and OptiStruct
solvers.
Use this tool to:
- Create mapped quad mesh using orthogonal lines that form rectangular panels.
- Create quad surface regions automatically using boundary lines.
- Create 1D stiffeners that surround panels.
- Apply a panel property per panel.
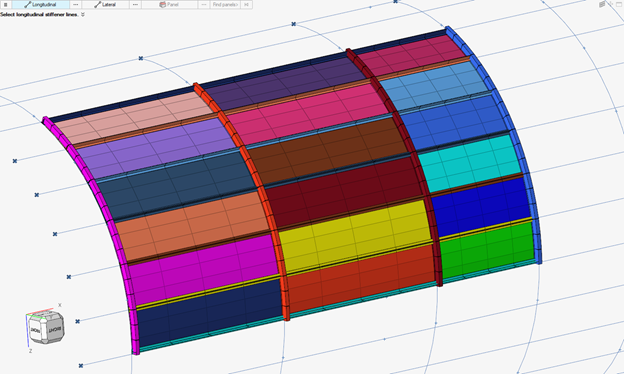
- Generate a Stiffened Panel PartAssembly with Panels and Stiffeners underneath.
Note: It is recommended that your model have orthogonal
lines.
-
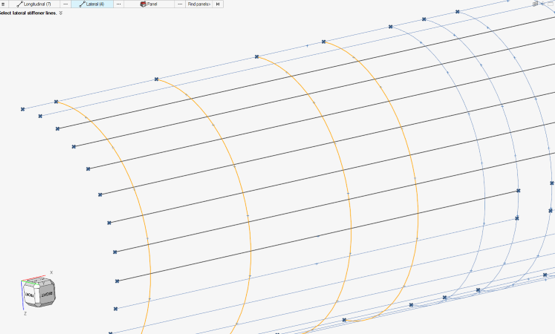
From the Concept ribbon, click the Stiffened Panel
tool.

Figure 1. -
Select lines.
- Select a collection of parallel lines that define “longitudinal stiffeners”.
- Select a collection of parallel lines that define “lateral stiffeners”.
Ideally, the two sets of lines are selected form an orthogonal network of lines from which panel surfaces are inferred.
Figure 2. - Optional:
Select a panel property to assign to shell mesh.
The selector filters the list of available properties to retain only:
- PSHELL
- PCOMP /PCOMPG /PCOMP
The selected property is duplicated and a copy is assigned per panel.
-
Click
 on the guide bar to select
options for model organization.
- Model Organization
-
- Create geometry and mesh in current component.
- Create a new component to store panels and stiffeners
- Create Part Assembly:
- The last option generates a new Part Assembly called “Stiffened Panel” with the following hierarchy:
-
- Stiffened Panel
-
- Panels
- Panel 1
- ...
- Panel n
- Stiffeners
-
- Longitudinal Stiffeners
- Longitudinal 1
- ...
- Longitudinal m
- Lateral Stiffeners
- Lateral 1
- ...
- Lateral k
- Stiffener Prefix
- Give a prefix to name stiffener components/parts per lateral/longitudinal directions, the default being Frames & Stringer.
- Delete Geometry
- Select to keep panel surfaces (organized with panel mesh) or delete after panel mesh.
- If "ignore material" is turned on, the tool assess area moments of inertia without considering the source material. If it is off, then material weighted moments of inertia are calculated.
-
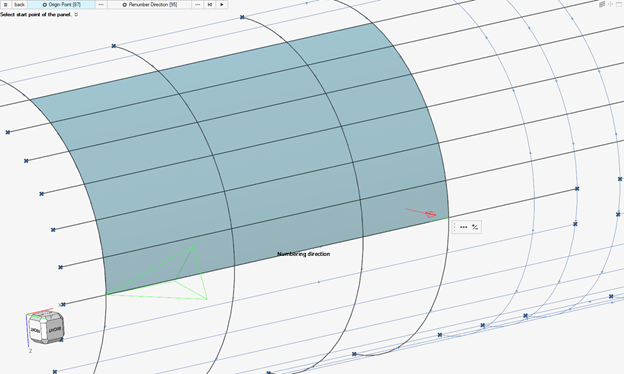
Click Find panels.
If panels are found, surfaces are created. Among the panels found, one of them (from four corners) is selected as a starting point. The whole mesh is treated as a single rectangular panel so element IDs increase by 1 along rows then jump to the next row.
-
If desired, update the numbering schema.
“Origin Point” and “Renumber Direction” are point selectors that define the primary direction (row).
At this stage, the Origin point is highlighted and a green arrow illustrates the numbering direction.
To change the schema:
- Select Origin Point then select one of the four corners of the created surfaces.
- Select Renumber Direction then pick the opposite point that defines the primary direction.
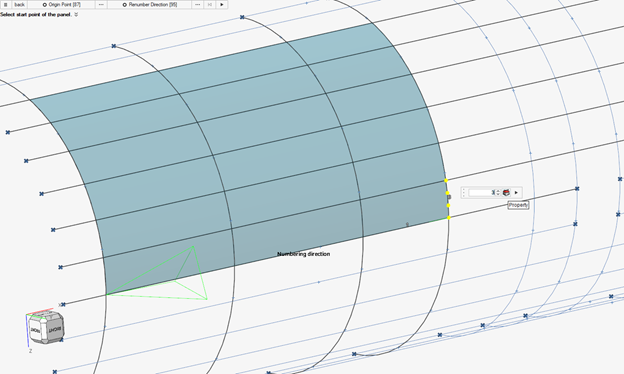
- Optional:
Click
 in the microdialog to flip
the red arrow direction, which illustrates on which side of the panels
stiffeners will be created.

Figure 3. -
Define the mesh size and stiffener property.
-
Select the manipulator on a reference panel edge and change the
density.
Only a single manipulator can be active at a time.
-
Click the property selector in the active manipulator.
This allows you to either select a property or a beamsection.If a property is selected, a filter enables only:
- PBAR/L
- PBEAM/L
- PROD
Depending on the property card image selected, 1D stiffeners are created accordingly. If a beamsection is selected, then the tool generates PBEAM/CBEAM elements by default.

Figure 4.
Figure 5. -
Select the manipulator on a reference panel edge and change the
density.